
Building the perfect gaming room isn’t about throwing money at RGB lights and hoping for the best. It’s about creating a space that balances performance, comfort, and aesthetics, where you can grind ranked matches for hours, stream without technical hiccups, or simply lose yourself in single-player campaigns. Whether you’re working with a spare bedroom, a basement corner, or repurposing your entire living space, the right gaming room setup can transform your experience from frustrating to phenomenal. In 2026, gamers have more options than ever for displays, peripherals, and room configurations, but that abundance can make decision-making overwhelming. This guide cuts through the noise to help you build a gaming space tailored to your needs, budget, and available square footage.
Key Takeaways
- A strategic gaming room setup prioritizes ergonomics, display quality, and cable organization over expensive RGB lighting and flashy aesthetics.
- Monitor selection should match your gaming style: competitive games benefit from 144Hz+ refresh rates and 1ms response times, while single-player games prioritize resolution and panel quality like 1440p OLED.
- Invest in a proper gaming desk (60-72 inches wide, 30-inch depth) and ergonomic chair with adjustable lumbar support to prevent pain during marathon sessions and long-term health issues.
- Smart lighting and bias lighting behind monitors reduce eye strain and create ambiance without glare, while acoustic treatment and heavy curtains prevent noise bleed to neighbors.
- Plan your gaming room layout before purchasing equipment by measuring space, assessing outlet locations, and mapping zones to avoid cramped setups and tangled cables.
- Personalization through intentional color schemes, wall art, and cable management transforms a generic space into a functional gaming room that enhances both performance and enjoyment.
Planning Your Gaming Room Layout
Before buying a single piece of furniture or equipment, map out your space. A poorly planned gaming room leads to cramped setups, tangled cables, and ergonomic nightmares that’ll wreck your posture and performance.
Assessing Your Available Space
Start by measuring everything. Wall dimensions, door swing clearance, window placement, and power outlet locations all matter. A small gaming room doesn’t mean compromising on quality, it means being strategic.
For compact spaces under 100 square feet, corner desk configurations maximize usable area while keeping everything within arm’s reach. L-shaped or corner desks fit snugly against two walls, freeing up floor space for a proper gaming chair and maybe a mini fridge. Small gaming room ideas often center on vertical storage: wall-mounted shelves for collectibles, pegboards for headsets and controllers, and monitor arms instead of bulky stands.
If you’re working with a full bedroom gaming room (120-200 square feet), you’ve got flexibility. Separate your gaming zone from other functions, bed on one side, battlestation on the other. This creates mental separation between gaming and sleep, which sounds trivial until you’re grinding at 2 AM and can’t wind down afterward.
Larger gaming rooms (200+ square feet) open up possibilities for multiple stations, streaming setups, or dedicated console areas. Map out “zones” on paper first: PC gaming zone, console/TV area, streaming corner, storage wall. Leave at least 3-4 feet of clearance behind your chair for movement and cable access.
Choosing the Right Room Location
Not all rooms are created equal for gaming setups. Basements offer natural soundproofing and climate stability, but watch for humidity issues that can damage electronics. Ground-level rooms simplify internet hardwiring and often have more power outlets, but you’ll need better soundproofing if housemates or family are nearby.
Avoid rooms with excessive natural light hitting your displays directly, glare kills immersion and makes color accuracy inconsistent. If you’re stuck with a sun-facing room, invest in blackout curtains or cellular shades. South and west-facing windows get the harshest afternoon light.
Consider proximity to your router. Wi-Fi works, but hardwired Ethernet eliminates latency spikes during competitive sessions. If running cable through walls isn’t an option, powerline adapters or MoCA adapters offer middle-ground solutions with sub-10ms ping increases over direct Ethernet.
Noise transmission matters for late-night sessions. Rooms sharing walls with bedrooms or living spaces need acoustic treatment or at least thick curtains and rugs to dampen sound bleed.
Essential Gaming Room Furniture
Furniture makes or breaks your setup. Cheap out here and you’ll suffer through back pain, wobbly monitors, and cluttered chaos.
Gaming Desks: Size, Shape, and Features
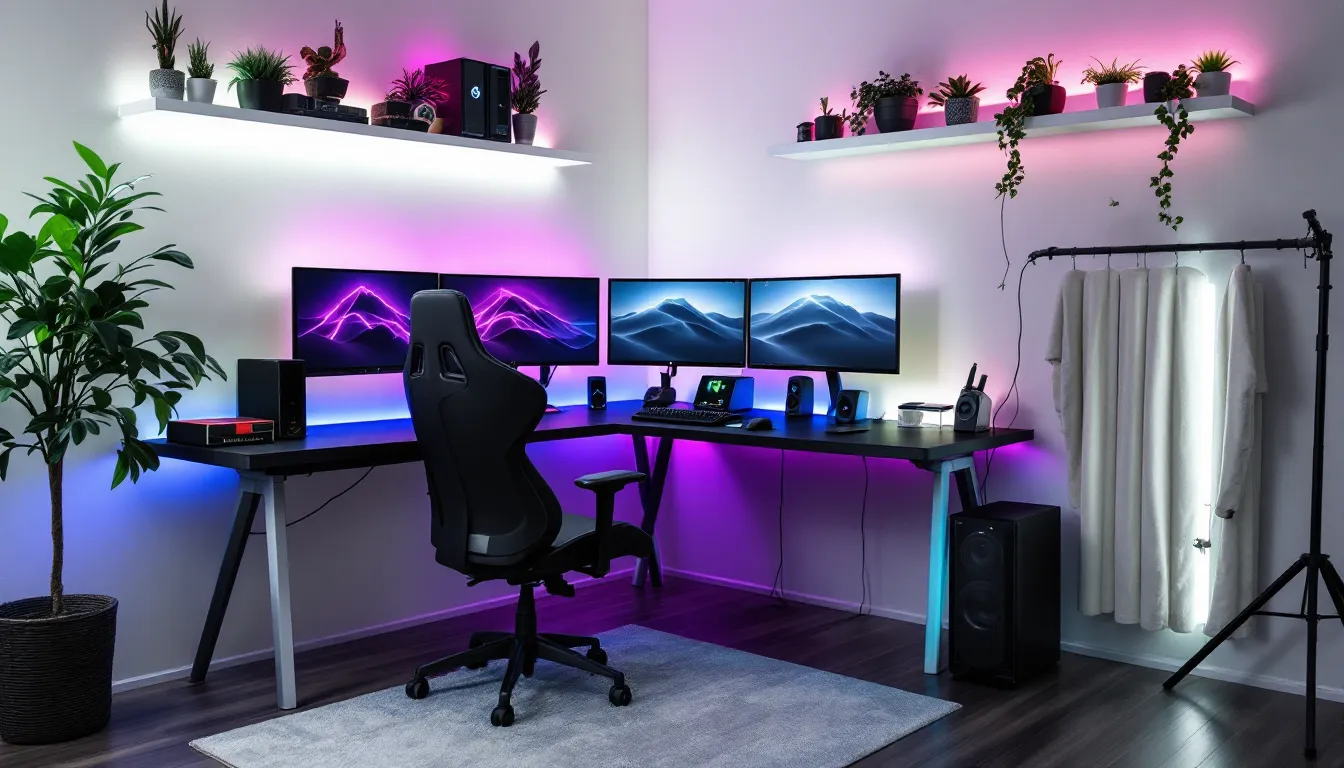
Desk size directly impacts what you can run. For a simple gaming setup with a single monitor and console, a 48-inch wide desk suffices. For dual or triple monitor configurations common in PC gaming setups, you need 60-72 inches minimum.
Depth matters more than most realize. Standard 24-inch deep desks force monitors too close, causing eye strain. Opt for 30-inch depth if running 27-inch or larger displays. This gives proper viewing distance (roughly arm’s length) and leaves room for keyboard, mouse, and a mousepad with actual space for low-DPI flick shots.
L-shaped desks dominate gaming bedroom setups because they provide distinct zones, main gaming area on one side, secondary monitor or console space on the return. Brands like Secretlab, ApexDesk, and Uplift offer electric standing desk options if you want height adjustment, though manual crank desks save $200-300 without sacrificing stability.
Look for integrated cable management: grommets, cable trays underneath, or channels routed into the desk surface. A desk without cable management becomes a rat’s nest within a week.
Material quality: Solid wood or thick particle board (at least 1 inch) prevents flex when you’re slamming keys during intense moments. Hollow-core desks wobble and feel cheap. If budget allows, motorized sit-stand desks improve circulation during marathon sessions, though they add $300-600 to your setup cost.
Gaming Chairs for Comfort and Performance
The “racing chair” aesthetic dominated for years, but ergonomic office chairs often outperform them for all-day comfort. The reality is that most racing-style gaming chairs prioritize looks over proper lumbar support.
Secretlab Titan Evo and Noblechairs remain solid gaming chair choices with actual adjustable lumbar, 4D armrests, and durable upholstery. But don’t sleep on office chairs from Herman Miller, Steelcase, or Autonomous, these support 8+ hour sessions better than most gaming-branded options.
Key features to demand:
- Adjustable lumbar support (not just a removable pillow)
- 4D armrests (height, width, depth, angle)
- Seat depth adjustment for different leg lengths
- Recline with tension control
- Breathable material (mesh or perforated leatherette)
Test before buying if possible. Chairs feel different after hour three than in the showroom. For bedroom gaming setups where aesthetics matter, match chair color to your overall theme rather than defaulting to red-and-black gamer chairs that clash with everything.
Storage Solutions for Games and Gear
Physical game collections, controller charging stations, VR headsets, multiple peripherals, gaming gear accumulates fast. Without dedicated storage, your setup gaming area becomes cluttered and chaotic.
Wall-mounted shelving keeps collectibles and game cases visible while freeing desk and floor space. IKEA Lack shelves or floating shelves from Amazon work for lightweight items. For heavier gear (consoles, speaker systems), use brackets rated for 50+ pounds.
Drawer units under or beside your desk handle controllers, cables, and smaller accessories. Alex drawer units from IKEA became a gaming setup staple because they fit perfectly under most desks and provide ample storage for $80-100.
Pegboards are underrated for gaming rooms. Mount one behind your desk for headset hooks, cable organizers, and controller holsters. Spray-paint it to match your color scheme, instant personalization that’s also functional.
For ultimate gaming setup scenarios with multiple platforms, consider a media console or TV stand with closed storage. This hides cable boxes, routers, and power strips while keeping dust off your hardware.
Display and Monitor Setup
Your display is the primary interface with every game you play. Compromising here hurts performance and enjoyment more than any other component.
Selecting the Right Monitor Configuration
For competitive shooters and esports titles, prioritize refresh rate and response time over resolution. A 1080p 240Hz monitor with 1ms response time beats a 4K 60Hz panel for games like Valorant, CS2, or Apex Legends.
Detailed testing from RTINGS consistently shows that 144Hz is the minimum refresh rate where competitive advantage becomes measurable. Anything below that puts you at a tangible disadvantage in fast-paced games. Many custom gaming rigs built in 2026 target 240Hz or 360Hz displays to match high-end GPU capabilities.
For single-player, RPG, and immersive titles, resolution and panel quality matter more. 1440p hits the sweet spot for most PC gaming setups, sharper than 1080p without the GPU requirements of 4K. OLED panels offer perfect blacks and instant response times but cost significantly more and risk burn-in if you display static HUDs for thousands of hours.
Dual monitor setups are standard for streaming or productivity mixed with gaming. Run your main gaming display (high refresh rate, 1440p or 1080p) alongside a secondary 60Hz panel for Discord, browser tabs, or OBS. Mount the secondary vertically if you’re reading Discord servers or monitoring Twitch chat.
Ultrawide monitors (21:9 or 32:9 aspect ratio) immerse you in single-player games but aren’t supported in competitive multiplayer, most esports titles lock to 16:9 to prevent unfair advantage. The Samsung Odyssey G9 and LG 38″ ultrawides dominate this category in 2026, offering curve radius that wraps your peripheral vision.
Monitor arms beat stock stands every time. They free up desk space, allow precise height/tilt adjustment, and improve cable management. Amazon Basics and Ergotron arms handle up to 32-inch displays reliably for under $100.
TV Setup for Console Gaming
Console gaming in a bedroom gaming room or dedicated gaming space benefits from larger displays than desk-based PC setups. PS5, Xbox Series X, and Nintendo Switch players should target 55-65 inch TVs with HDMI 2.1 support for 4K 120Hz output.
Input lag matters as much as refresh rate. Gaming-specific TVs from LG (C3/C4 OLED series), Samsung (QN90 series), and Sony (X90 series) offer sub-10ms input lag in game mode. Avoid budget TVs with 30-50ms lag, you’ll feel the delay in every button press.
Viewing distance for TVs: sit roughly 1.5x the screen diagonal away for 4K content. A 65-inch TV means sitting 8-9 feet back. Closer than that and you’ll strain your neck tracking action across the screen.
Mount your TV at eye level when seated. Too high (above a fireplace, for example) causes neck strain during long sessions. Low-profile TV wall mounts cost $20-50 and eliminate the need for bulky TV stands, opening floor space in small gaming room ideas.
HDR support (HDR10 or Dolby Vision) adds meaningful visual punch in games that support it, Horizon Forbidden West, Elden Ring, and Forza Motorsport all shine with proper HDR implementation. Cheap TVs fake HDR and look worse than SDR: stick with sets that hit at least 600 nits peak brightness.
Lighting Your Gaming Room
Lighting sets the mood, reduces eye strain, and ties your aesthetic together. But gimmicky RGB everywhere isn’t the answer, strategic lighting is.
RGB and Ambient Lighting Options
RGB strips became a gaming room staple for good reason, they’re cheap, customizable, and instantly elevate cool gaming setups. Philips Hue, Govee, and Nanoleaf dominate the smart lighting space, with app control, music sync, and preset scenes.
Place RGB strips behind your desk, along the top edge of walls (cove lighting), or behind your monitor for bias lighting effects. Avoid pointing RGB directly at your face or monitors, indirect lighting creates ambiance without glare.
Smart bulbs in overhead fixtures let you dim or change color temp throughout the day. Cool white (5000-6500K) for competitive sessions keeps you alert: warm white (2700-3000K) for evening casual gaming reduces blue light before bed.
Govee and Nanoleaf offer camera-based systems that sync room lighting to on-screen content, explosions flash orange, forests glow green. It’s gimmicky but genuinely immersive in single-player games. Not worth it for competitive gaming where you need consistent lighting.
Accent lighting on shelves with collectibles or gaming memorabilia adds depth. Small LED puck lights or strip segments highlight figures, game cases, or artwork without overpowering the room.
Bias Lighting and Eye Comfort
Bias lighting, a strip of neutral white light behind your monitor, reduces eye strain by minimizing the contrast between bright displays and dark rooms. It’s not aesthetic: it’s functional.
MediaLight or any 6500K LED strip mounted on the back of your monitor improves perceived contrast and reduces the eye fatigue that comes from staring at a bright rectangle in a dark room. This matters during long sessions where you’re grinding ranked or pushing through a 60-hour RPG.
Avoid colored bias lighting for competitive gaming, neutral white preserves color accuracy and doesn’t distract. Save the RGB for ambient room lighting.
Room brightness balance: Don’t game in total darkness. Low ambient lighting (floor lamp, LED strip along the wall) prevents your pupils from constantly dilating and contracting as the screen brightness changes. This subtle detail reduces headaches during marathon sessions.
Audio Setup for Immersive Gaming
Audio often gets overlooked in gaming room setup ideas, but footsteps in FPS games, environmental cues in horror titles, and voice chat clarity all hinge on your audio setup.
Headsets vs. Speaker Systems
Headsets dominate for competitive gaming and late-night sessions. Closed-back models isolate you from external noise and prevent sound bleed to roommates. Open-back headsets sound more natural and spacious but leak audio, fine for solo gaming rooms, terrible for shared spaces.
Top-tier wired headsets like the Sennheiser HD 560S, Beyerdynamic DT 990 Pro, or Audio-Technica ATH-R70x outperform “gaming” headsets in soundstage and clarity, though they require separate mics. Pair them with a ModMic or desktop mic for comms. For all-in-one convenience, investing in quality gaming audio delivers both performance and comfort.
Wireless adds convenience but introduces latency (5-15ms typical) and requires charging. For single-player gaming that’s fine: for competitive FPS where audio cues matter, stick with wired.
Speaker systems work for casual gaming in private spaces. 2.1 setups (two speakers plus subwoofer) like the Logitech Z623 or Edifier S350DB deliver room-filling sound for $150-250. For ultimate gaming setup scenarios, 5.1 or 7.1 surround systems create spatial audio that headsets can’t match, though they require room treatment to sound their best.
Pro tip from ProSettings: most pro FPS players use stereo headsets, not surround. Virtual 7.1 muddies directional audio: stereo with good imaging pinpoints footsteps more accurately.
Soundproofing and Acoustic Treatment
If you’re streaming, recording content, or gaming late in shared housing, soundproofing prevents noise complaints. True soundproofing requires construction (mass-loaded vinyl in walls, double drywall), but acoustic treatment reduces echo and dampens sound transmission affordably.
Acoustic foam panels on walls absorb mid and high frequencies, reducing echo that makes rooms sound boxy. Place them at first reflection points (side walls at ear level, wall behind you). They won’t block sound from leaving the room, but they’ll improve how your room sounds internally.
Heavy curtains over windows and doors dampen sound transmission better than blinds. Soundproof curtains with mass-loaded cores cut 5-10 decibels of noise bleed.
Rugs and carpet absorb sound better than hard floors. If your gaming bedroom setup is in a room above others, a thick rug under your desk and chair reduces impact noise from foot taps and chair movement.
For recording or streaming, foam door seals and draft stoppers block sound leakage around door frames. Cheap fix that makes measurable difference in room isolation.
Cable Management and Organization
Nothing ruins the aesthetic of cool gaming setups faster than cable spaghetti. Proper cable management isn’t just cosmetic, it improves airflow, simplifies troubleshooting, and prevents accidental unplugs during heated moments.
Start with cable raceways or channels mounted along the back edge of your desk and down the legs. These plastic or metal troughs hide power cables, USB lines, and display cables in organized bundles. J-channels work well for vertical runs down desk legs or walls.
Velcro cable ties beat zip ties because they’re reusable. Bundle cables by type, power cables together, USB/data cables together, audio cables separate. Leave slight slack so cables aren’t under tension, which can damage connectors over time.
Cable clips stick to the underside of your desk and guide individual cables to peripherals. Run your mouse and keyboard cables through clips so they drop straight down to your devices without crossing the desk surface.
Power strip mounting: Attach your power strip or surge protector to the underside of your desk with heavy-duty velcro or mounting brackets. This keeps it accessible without cluttering floor space. Use strips with individual switches to cut phantom power draw when gear isn’t in use.
For advanced setups with multiple monitors and peripherals, a cable management spine behind your monitor arm or stand organizes the bundle of HDMI, DisplayPort, USB, and power cables running up to your displays. These spines keep everything aligned and hidden from view.
Label cables at both ends with tape or printed labels. When you need to troubleshoot or upgrade, you’ll know instantly which cable goes where without tracing the entire run. This 5-minute task saves hours of frustration later.
Consider a properly designed PC case with built-in cable management features if you’re building or upgrading, cases with PSU shrouds, cable routing cutouts, and tie-down points make internal organization dramatically easier.
Climate Control and Ventilation
Gaming hardware generates serious heat. Multiple monitors, a high-end GPU, and peripherals can push room temperature up 5-10 degrees Fahrenheit during extended sessions. Poor ventilation throttles performance and shortens hardware lifespan.
Keep room temperature between 65-75°F for optimal component performance. GPUs start thermal throttling around 80-85°C: sustained high temps degrade silicon over time. If your gaming room setup lacks central AC, a portable air conditioner or window unit becomes essential during summer months.
Airflow matters as much as temperature. Stagnant air creates hot pockets around your PC and consoles. Position a desk fan or tower fan to create cross-ventilation, cool air in from one side, hot air out the other. Don’t point fans directly at yourself or your gear: aim for general room circulation.
Ensure your gaming desktop PC has adequate intake and exhaust fans with clear airflow paths. Desks with enclosed backs or shelves suffocate PCs, leave at least 6 inches of clearance on all ventilated sides.
Humidity control protects electronics from moisture damage and static buildup. Aim for 40-60% relative humidity. Too high and you risk condensation on cold components: too low and static discharges can fry sensitive electronics. A basic hygrometer costs $10-15 and monitors conditions.
In dry climates or winter months, a small humidifier prevents static buildup. In humid regions or basements, a dehumidifier prevents moisture issues. Both improve comfort during long gaming sessions, dry air irritates eyes and sinuses, while high humidity makes rooms feel stuffy.
Dust management: Hot rooms with poor ventilation accumulate dust faster. Dust clogs fans, insulates components, and degrades performance. Use dust filters on PC intake fans and clean them monthly. Air purifiers with HEPA filters reduce airborne dust that settles on equipment.
Personalization and Aesthetic Touches
Your gaming space should reflect your personality and favorite games. Generic setups feel sterile: personalized gaming rooms become spaces you actually want to spend time in.
Wall Art and Gaming Memorabilia
Framed posters from your favorite games transform blank walls into statements. Avoid generic prints, Displate metal posters, custom canvas prints from Etsy, or officially licensed art from Cook and Becker offer quality that stands out.
Floating shelves display collectibles, limited edition controllers, or game cases. Arrange them asymmetrically for visual interest rather than perfectly level rows. Backlight shelves with LED strips to highlight your collection.
Neon signs (real glass or LED replicas) add instant personality. Game logos, famous quotes, or custom text work as focal points. RedditBuySellTrade communities and Etsy shops offer custom neon at reasonable prices.
For ultimate gaming setup aesthetics, consider a feature wall behind your main battlestation. Accent color paint, wood paneling, hexagon tiles, or 3D wall panels create depth and visual interest. This becomes your background for streams or photos.
Avoid clutter. More isn’t always better. A few high-quality pieces (a framed map from Elden Ring, a Destiny ghost replica, a signed poster) look better than 50 random items crammed together.
Color Schemes and Theme Selection
Choose a 2-3 color palette and stick with it. Mismatched RGB rainbow vomit looks chaotic: intentional color schemes look professional.
Popular gaming room themes:
- Monochrome: Black/white/gray with single accent color (red, blue, purple). Clean, modern, easy to execute.
- Cyberpunk: Neon pink and blue, dark backgrounds, urban tech aesthetic. Very 2020s, slightly overdone but still popular.
- Minimalist: Neutral tones, hidden cables, clean lines. Difficult to execute well but impressive when done right.
- Game-specific: Themed around one franchise (Halo, Final Fantasy, Zelda). Commit fully or don’t bother, half-themed looks disjointed.
- Industrial: Exposed brick (or faux brick panels), metal fixtures, Edison bulbs, wood accents. Works well for older building gaming rooms.
Match your RGB lighting, peripherals, wall colors, and furniture to your chosen scheme. Cohesion matters more than any individual expensive piece. Gaming bedroom ideas often blend the gaming aesthetic with general bedroom design, balance your gaming setup zone with complementary bedroom furniture and decor so the room functions for both gaming and living.
Paint or accent walls can ground your entire color scheme. Benjamin Moore Hale Navy, Sherwin-Williams Iron Ore, or dark charcoal grays work exceptionally well as backdrop colors that make RGB lighting pop without overwhelming the space.
Streaming and Content Creation Considerations
If you’re streaming on Twitch, creating YouTube content, or recording gameplay, your gaming room setup needs additional considerations beyond pure gaming performance.
Camera placement: Mount your webcam or DSLR at eye level, not looking up from below (unflattering angle). The camera should sit on or slightly above your monitor, angled down 5-10 degrees. Logitech Brio, Razer Kiyo Pro, or Sony ZV-E10 mirrorless cameras offer the best image quality for streaming in 2026.
Key lighting eliminates shadows and provides professional-looking video. A basic ring light or Elgato Key Light positioned at 45-degree angle to your face does the job. Avoid overhead-only lighting that casts harsh shadows under eyes and nose. Step-by-step guides from How-To Geek break down three-point lighting setups for optimal streaming presentation.
Microphone quality matters more than camera quality for streaming. Even a $100 USB mic like the Audio-Technica AT2020 or Blue Yeti beats any headset mic for clarity and presence. Mount mics on boom arms (Rode PSA1 or cheaper Amazon basics) to position close to your mouth without cluttering desk space.
Acoustic treatment improves recording quality dramatically. Even basic foam panels on the walls behind and beside you reduce echo and reverb that make rooms sound hollow on stream.
Background management: Your camera captures everything behind you. Either frame your shot to show an intentional, clean background (artwork, RGB-lit shelving, feature wall), or use a green screen for virtual backgrounds. Messy rooms or blank walls look unprofessional.
Stream deck or macro pad speeds up scene switching, muting, and clip creation. Elgato Stream Deck or LoupeDecks offer customizable buttons with display icons. Even budget alternatives like the Loupedeck Live S save time compared to hotkeys.
Bandwidth requirements: Streaming at 1080p 60fps to Twitch requires 6-8 Mbps upload speed minimum: YouTube allows higher bitrates for better quality. Hardwire your streaming PC or setup to your router, Wi-Fi upload speed fluctuates and causes dropped frames.
Dual-PC setups separate gaming from encoding, preventing performance hits. The gaming PC runs your game: the streaming PC handles OBS, chat overlays, and broadcast encoding. A capture card (Elgato HD60 X, AverMedia Live Gamer 4K) connects the two.
Conclusion
Building your ideal gaming room setup isn’t a one-weekend project, it’s an iterative process where you learn what works for your specific needs, space, and gaming style. Start with the foundations: proper desk and chair ergonomics, display configuration matched to your gaming preferences, and functional cable management. Layer in comfort features like climate control and lighting as budget allows. Finally, personalize the space with aesthetic touches that make it uniquely yours.
The difference between a simple gaming setup and an ultimate gaming setup isn’t necessarily cost, it’s intentionality. A well-planned small gaming room with thoughtful furniture placement, proper lighting, and organized peripherals outperforms a large, expensive room with poor layout and no cohesion. Whether you’re building a dedicated gaming bedroom, converting a spare room, or carving out a corner of your living space, focus on the fundamentals first. Everything else builds from there.
Your gaming room should enhance your performance, protect your health during long sessions, and reflect your passion for gaming. Nail those three elements, and you’ve created a space you’ll never want to leave.